
If you are planning to migrate your WordPress site to another domain, there are a few things you need to take into account. Migrating a WordPress site from one domain to another domain is not a complicated process, but there are a few steps you need to follow to for a smooth transition.
This blog explains the steps involved in the process of migrating your WordPress site to another domain. We will also provide you with some tips on how to make the transition as seamless as possible.
So, if you are ready to learn how to migrate your WordPress site to another domain, let’s get started!
Reasons to migrate your WordPress site
Migrating your WordPress site to another domain might be necessary for a number of reasons. Here are a few of the most common:

- You want to create a new website, but want to keep the same content
- You want to expand your reach by creating a new website on a different domain
- You want to switch to a new hosting provider
- You want to move to a subdomain or subdirectory
- You want to change the name of your domain
Other than this, the reasons to migrate your WordPress website to a different domain is to take advantage of a new trend, change the focus of the site, or simply because you want to start over with a new domain. Whatever the reason, you need to ensure that you follow the right steps to ensure a smooth migration.
How to Migrate your WordPress site to another domain – A step-by-Step Procedure
The process of migrating your WordPress site to another domain involves Following steps
Step 1: Choose a Domain Hosting
Choosing a Domain hosting providers is the first step in the website migration. Select a best domain hosting provider, before starting a migration process. Read the plans and services provided the various hosting providers and go with the best package. Here we listed some of the web hosting providers.
- SeekaHost
- BlueHost
- GoDaddy
- Hostingar
- SiteGround
We recommend to choose a SeekaHost- best web hosting platform, provides free WordPress website migration.
Step 2: Create a Backup Your WordPress website
Before doing any kind of migration activities, it is important to create a Backup for your WordPress website. It helps to recover your website if any unexpected issues during the migration process. A website backup is essentially a copy of your website’s files and database that can be used to restore your website to a previous state.
To create a backup, you can use a backup plugin or tool that is designed for your website platform, or you can use a manual process to copy your website files and database to a secure location, such as a cloud storage service or a local computer.
There are number of WordPress plugin available, Duplicator is one among them. Here we shared tips to create a Duplicator package of your WordPress site using the Duplicator plugin:
- Install and activate a WordPress plugin to your older website. After activating a Duplicator plugin, it will be added in your WordPress Menu
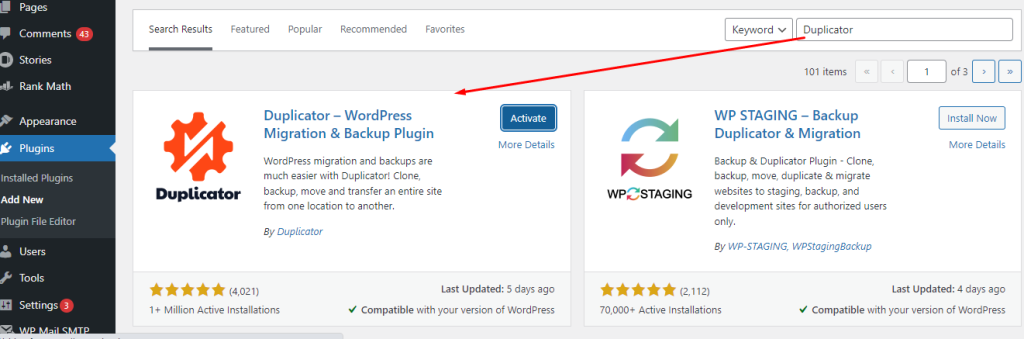
- Navigate to the Duplicator menu in your WordPress dashboard and click on the Packages tab. Click on the Create New button to create a new package.

- Follow the prompts to set up the package options, including the package name, storage location, and archive and installer filenames.

- Once the package creation process is complete, you can download the package files to your computer or upload them to a cloud storage service
- To use the package to duplicate your site on another server, you’ll need to upload the package files to the server and run the Duplicator installer script.
Step 3: Download All Files in your website
Download all essential files in your website. This ensures that you have a backup copy of your website in case something goes wrong during the migration process. This is also stated as Manual Backup.
To download all the files from your website, you can use an FTP. You will need to connect to your website server using your FTP credentials and navigate to the root directory of your website. From there, you can select all the files and folders and download them to your local computer.
It’s important to note that some files and folders may not be necessary for the migration, such as cache files or temporary files. You can exclude these files from the download to save time and storage space
Step 4: Export the Database
After the completion of backup process, you will need to export the database. Exporting the database is an important step when migrating a WordPress website. The database contains all the content and settings of your website, including posts, pages, comments, and user accounts, among other things. Exporting the database allows you to transfer this data to the new domain, so that your new website has the same content and settings as your old one.
To export the database from your WordPress website, you can use the built-in Export tool. This tool allows you to export your website’s content in an XML format that can be imported into another WordPress website.
- Go to Tools > Export.

- Select the content you want to export (e.g. all content, posts, pages, etc.).

- Choose the file format you want to export the data in.
- Click the “Download Export File” button.
Step 5: Updating a WordPress on New Domain
Make sure that the content of your old website is accessible on the new domain, you will have to update the domain settings. This will ensure that all the links on the previous domain point to the new domain. This step ensures that visitors who access your website through the old domain are redirected to the new domain,

- Log in to your domain registrar’s account
- Locate the DNS settings for the old domain.
- Change the CNAME record to point to the IP address or domain of the new website.
Step 6: Import the Database.
After changing the domain settings, you can proceed to import the database that you previously exported from your old website. Importing the database into the new website ensures that all the content and settings from the old website are transferred to the new website.
For importing a file,
- Go to Tools > Import.

- Choose “WordPress” from the list of options.
- Click the “Choose File” button and select the XML file containing the exported database from your old website.
- Click the “Upload file and import” button.
The process may take several minutes, depending on the size of the database and the number of media files being imported.
Step 7: Set up a Redirect
After importing all files to the new site, Make sure to set-up a redirect. Setting up a redirect from the old domain to the new domain brings all your visitors to your new website. This step will prevent your website from losing traffic or visitors due to the domain migration. Go with 301 redirect, because it is a permanent redirect that tells search engines and visitors that the content has moved permanently to a new location
Step 8 : Submit your New domain in Google Search Console
After the migration process submit your new WordPress site to the Google Search Console after migrating it to a new domain.
- Go To your Google search console account, select your property and click settings.
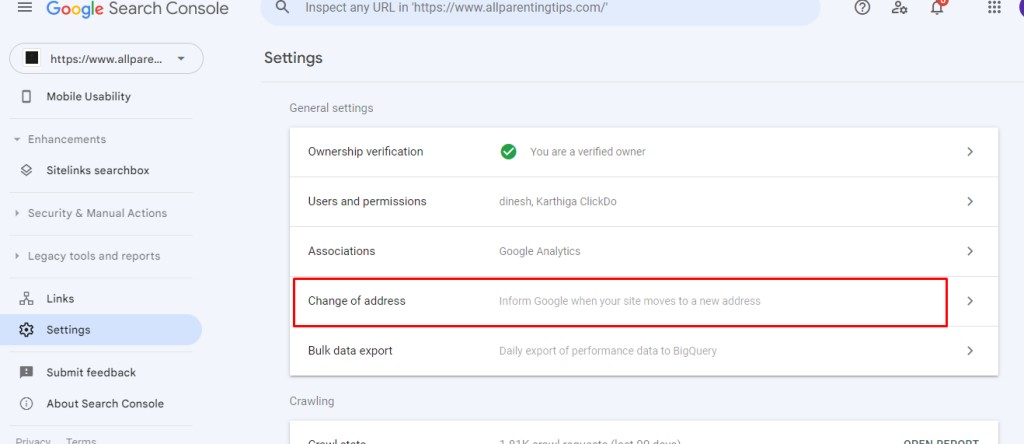
- In settings option look for “change of addresss” option
- Select new domain name on the “Update Google” option and click validate and update.
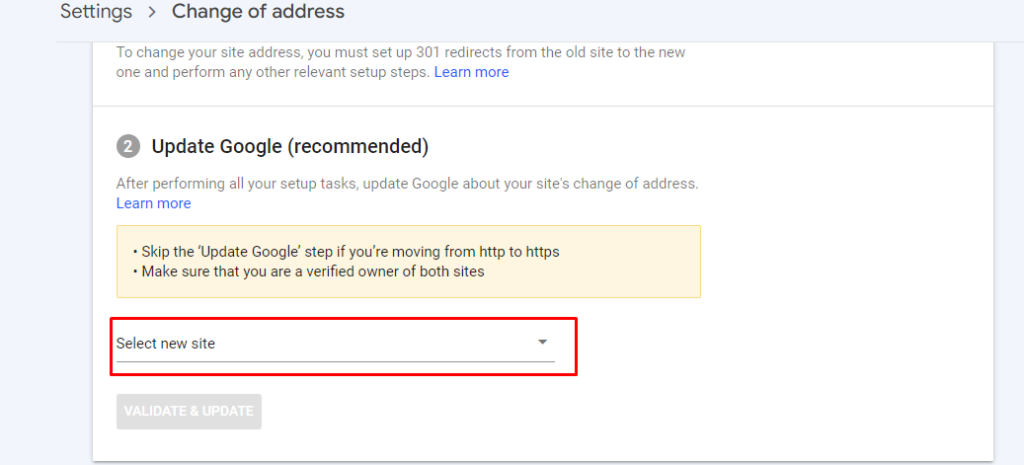
Now Google will validate your new domain and update it for a better search.
Wraping – UP
Migrating a WordPress website from one domain to another can be a challenging process, but following the steps outlined in this guide, can help make the process more manageable. By preparing the website for migration, taking a backup, getting a new server, copying the files and database, updating the DNS, and creating 301 redirects, the migration can be completed quickly, efficiently, and without any major complications.
